> For the complete documentation index, see [llms.txt](https://wiki.reanimated.lt/llms.txt). Markdown versions of documentation pages are available by appending `.md` to page URLs; this page is available as [Markdown](https://wiki.reanimated.lt/dev/mac/set-up-for-web-development.md).
# Set Up For Web Development
A guide to getting your Macbook ready for web development — tools, shortcuts, accessories, tips and tricks, and more.
I recently switched jobs, and during the first few days on the new job, I had to setup a MacBook with all the tools required for me to do my job, web development. Although, I’ve used Macs for a long time, at my previous job I was developing on a PC with Windows 10. It was surprisingly pleasant and productive once I got [WSL](https://docs.microsoft.com/en-us/windows/wsl/about) up and running, but I’m really glad to have a Mac as my primary workstation once again.
Every now and then, I look for guides like this one to see what tools people are using and to get productivity tips. And almost always I learn about something new that makes my life as a developer easier. I’ve kept notes of all the things I installed and configured during the first weeks on the new job hoping it’d be useful to other developers.
## macOS Settings
Let’s start with a few changes you can make to macOS and the built-in apps.
### System preferences
**Keyboard**\
`Keyboard > T️️ouch Bar Shows: F1, F2, etc. Keys`\
`Keyboard> Press Fn key to: Show Control Strip`
These two settings are about the touch bar. As a developer, I find myself using the F keys more often (a lot of shortcuts rely on them) than the other options — thus I prefer to have them be the default.
**Dock**\
`️️☑️ Automatically hide and show the Dock`
More often than not, I use Spotlight (**⌘ Space**) or the terminal to launch applications instead of the dock — it’s hard to justify dedicating such display real estate to it. Besides, you can easily access it by moving your mouse to the bottom of the screen or by pressing **⌃ F3**.
**Trackpad**\
`Point & Click > ️️☑️ Tap to click`
Once you get used to it, it’s way faster to tap instead of click.
**Accessibility**\
`Pointer Control > Mouse & Trackpad > Trackpad Options… > ️️☑️ Enable dragging`
By enabling trackpad dragging, you’ll be able to drag files, select text, etc., by double tapping (and holding the second tap).
### Finder
**Preferences**\
`Preferences > Advanced > ☑️ Show all filename extensions`
**View options**\
`View > Show Path Bar`\
`View > Show Status Bar`
**Show hidden files**\
Type `defaults write com.apple.Finder AppleShowAllFiles true` in terminal,\
or press **⇧⌘** .
### Screenshot
**Change where screenshots are saved**\
Open the Screenshot app via Spotlight search or by pressing **⇧⌘ 5**, find the `Options` menu at the bottom of the screen, then select a folder under `Save to`
## macOS Shortcuts
These are some the mac shortcuts I use the most (I won’t list the very basic ones like ⌘ C, ⌘ V, ⌘ Tab, etc.). For a more comprehensive list, click [here](https://support.apple.com/en-us/HT201236).
**System wide**\
Spotlight search: **⌘ Space**\
Character Viewer: **⌃⌘ Space** (Quickly find emojis and special characters)\
Force quit an app: **⌥⌘ Esc**\
Lock screen: **⌃⌘ Q**\
Show or hide the Dock: **⌃ F3** or **⌥⌘ D**\
Show all windows: **⌃ Arrow-Up**\
Show all windows of the front app: **⌃ Arrow-Down**\
Forward delete: **fn delete**\
Paste without formatting: **⇧⌘ V**
**Screenshot**\
Open Screenshot app: **⇧⌘ 5**\
Save screenshot of the screen: **⇧⌘ 3**\
Save screenshot of a portion of screen: **⇧⌘ 4**\
Save screenshot of a window: **⇧⌘ 4 + Space**\
Copy screenshot of the screen: **⇧⌃⌘ 3**\
Copy screenshot of a portion of screen: **⇧⌃⌘ 4**\
Copy screenshot of a window: **⇧⌃⌘ 4 + Space**
**Finder**\
Open the home folder: **⇧⌘ H**\
Open the desktop folder. **⇧⌘ D**\
Open the parent folder: **⌘ Arrow-Up**\
Go to the previous folder: **⌘ \[**\
Go to the next folder: **⌘ ]**\
Show or hide hidden files: **⇧⌘ .**
## Command-line Tools
Now to the fun part. These are the command line–related tools I recommend for any web developer.
### [Homebrew](https://brew.sh)
It’s *the* package manager. It allows you to install, uninstall, and update command-line tools and Mac applications.
To install it, open the terminal, and run this command:
```
/bin/bash -c “$(curl -fsSL https://raw.githubusercontent.com/Homebrew/install/master/install.sh)"
```
During the installation, you might be asked to install the Xcode Command Line Tools if you haven’t already. Just follow the instructions on the screen.
To make sure your system is ready to brew, run `brew doctor`.
You can now search for packages with `brew search` and install them with `brew install` (for command-line tools) and `brew cask install` (for macOS applications).
You can list installed packages with `brew list` and `brew cask list`.
To update the packages’ local registry you can run `brew update`, and to upgrade the installed packages to their latest versions, type `brew upgrade`.
I recommend running `brew doctor` every now and then to make sure things are good and `brew cleanup` to remove unused files.
### [iTerm2](https://www.iterm2.com)
It’s a replacement for the terminal. It offers a [lot of features](https://www.iterm2.com/features.html) that are really useful. I’ll list my favorite ones below.
To install it, open the terminal (this is the last time you’ll need it), and run:
```
brew install --cask iterm2
```
Now, feel free to replace terminal from the Dock (if you have it) with iTerm2. Or just open Spotlight and type iTerm2.
**Hotkey window**\
You can show or hide the iTerm2 window via a hotkey from anywhere very quickly.
`Preferences > Keys > Hotkey > ☑️ Show/hide all windows with a system-wide hotkey`
I recommend using **⌘ \`** as the hotkey.
**Unixyness**\
Copy on selection, paste on middle click, and focus follow the mouse.
`Preferences > General > Selection > ☑️ Copy to pasteboard on selection`\
`Preferences > Pointer > General > ☑️ Three-finger tap emulates middle click`\
`Preferences > General > Pointer > ☑️ Focus follows mouse`
**Disable native full screen**\
By disabling native full screen, you can quickly make iTerm2 take the whole screen without the usual full-screen animation.
`Preferences > General > Window > ☐ Native full screen windows`
Shortcut for full screen: **⌥ Return**
**Split panes**\
You can divide up your tabs into multiple panes with separate sessions and quickly switch between them. This works very nicely with focus-follow mouse.
`Right Click > Split Pane Vertically`\
`Right Click > Split Pane Horizontally`
I recommend creating new key bindings for those actions:\
`Preferences > Keys > Key Binding > +`\
I use **⌥ v** and **⌥ h**.
**Shell integration**\
You can enable better integration between your shell and iTerm2.
`iTerm2 > Install Shell Integration`
Then, add the following to your `.zshrc` (more details about Zsh can be found in the next sections): `source ~/.iterm2_shell_integration.zsh`.
See the [docs](https://www.iterm2.com/features.html#shell-integration) for more information.
**Profile settings**\
Feel free to explore these settings and configure your profile to your liking. I recommend experimenting with background opacity and blur.
### [Git](https://git-scm.com)
The most popular version-control system. You should install it with Homebrew before continuing:
```
brew install git
```
Visual Studio Code supports Git (and several other VCSs via extensions). But if you want to take your Git via CLI to the next level, you should check out [lazygit](https://github.com/jesseduffield/lazygit) and/or [forgit](https://github.com/wfxr/forgit).
If you want better diffs, check out [Delta](https://github.com/dandavison/delta).
### [Zsh](https://www.zsh.org)
As macOS’s default shell since Catalina, Zsh is built on top of Bash and provides a lot of cool features.
The first thing I recommend is having Homebrew manage its installation — open iTerm2, and run:
```
brew install zsh
```
To update our default shell to be Homebrew’s Zsh, we need to edit the shell’s whitelist: `sudo vim /etc/shells`. (If you’re not comfortable with Vim, you can use TextEdit instead by running `sudo open /etc/shells`.)
Add a new line with `/usr/local/bin/zsh`, save, and close.
To change the default shell, run: `chsh -s /usr/local/bin/zsh`.
Restart the terminal, and confirm we’re on the correct Zsh by running:\
`echo $SHELL`. You should see `/usr/local/bin/zsh`.
Now, we have access to [many](http://zsh.sourceforge.net/Intro/intro_toc.html) features. My favorites are:
**Tab completion**
Press `TAB` to complete a command:
Command completion
Zsh will show you all the available commands you can use. If you press `TAB` again, you’ll be able to navigate between the options by pressing `TAB` or the `RIGHT` and `LEFT` arrows. Confirm the command you want by pressing `SPACE` or `RETURN`.
Press `TAB` to complete file and folder names:
File and folder completion
And it’s smart enough if you type just a substring: `cd p/s` expands to `cd project/src`.
**Globbing (aka filename generation)**\
List only files in the current directory: `ls *(.)`
List only folders in the current directory and its subdirectories: `ls **/*(/)`
Remove all `.DS_Store` files recursively: `rm -rf **/.DS_Store`. (If you want to be sure which files will be deleted, you can press `TAB` before running the command, and Zsh will expand the pattern)
There are [lots of qualifiers](http://zsh.sourceforge.net/Doc/Release/Expansion.html#Glob-Qualifiers) you can use to target files with specific attributes. You can enable the more complex ones by running `setopt extended_glob`.
[Here](https://www.refining-linux.org/archives/37-ZSH-Gem-2-Extended-globbing-and-expansion.html)’s one command to recursively match all normal files that have no uppercase characters or numbers in the name. They’re executable for the owner but not for the rest of the world. The owner must have the UID 1002, the file size must be above 30MB, and it must have been modified within the last month: `ls -l **/([^A-Z[:digit:]])##(#q.x^X^u1002Lm+30mM-1)`
You can find many other useful tips [here](https://reasoniamhere.com/2014/01/11/outrageously-useful-tips-to-master-your-z-shell/).
And my list of keyboard shortcuts:
### [Oh My Zsh](https://ohmyz.sh)
Regardless of its odd name, Oh My Zsh is a community-driven framework for managing your Zsh configuration. It provides hundreds of plugins and themes and makes configuring Zsh a breeze.
To install Oh My Zsh, run:
```
sh -c “$(curl -fsSL https://raw.github.com/ohmyzsh/ohmyzsh/master/tools/install.sh)"
```
We can configure Zsh by running `vim ~/.zshrc` or (`open ~/.zshrc` if you prefer TextEdit over Vim). You’ll see a lot of configurations added by Oh My Zsh that you can play with. If you ever need to reset your `.zshrc`, you can find the template [here](https://github.com/ohmyzsh/ohmyzsh/blob/master/templates/zshrc.zsh-template).
I’ll list my recommendations below, but I highly recommend you browse the available [themes](https://github.com/ohmyzsh/ohmyzsh/wiki/Plugins) and [plugins](https://github.com/ohmyzsh/ohmyzsh/wiki/Plugins) later.
**Theme**\
[Powerlevel10k](https://github.com/romkatv/powerlevel10k) is my theme of choice — it’s fast, it’s [really well integrated with Git](https://github.com/romkatv/powerlevel10k#what-do-different-symbols-in-git-status-mean), it supports icons, and [a lot more](https://github.com/romkatv/powerlevel10k#features).
It has a really nice wizard that walks you through configuring it the first time that you run it:
Powerlevel10k configuration wizard
I highly recommend enabling [Transient Prompt](https://github.com/romkatv/powerlevel10k#transient-prompt).
To install it with Homebrew, run:
```
brew install romkatv/powerlevel10k/powerlevel10k
```
And add the following line to your `.zshrc`:\
`source /usr/local/opt/powerlevel10k/powerlevel10k.zsh-theme`
It’ll override any value you have set `$ZSH_THEME` to.
Restart iTerm2, and you should see the configuration wizard. In the future, you can run it again with `p10k configure`.
**Zsh plugins**
* [zsh-syntax-highlighting](https://github.com/zsh-users/zsh-syntax-highlighting): It enables highlighting of commands while they’re typed. This helps in reviewing commands before running them, particularly in catching syntax errors.
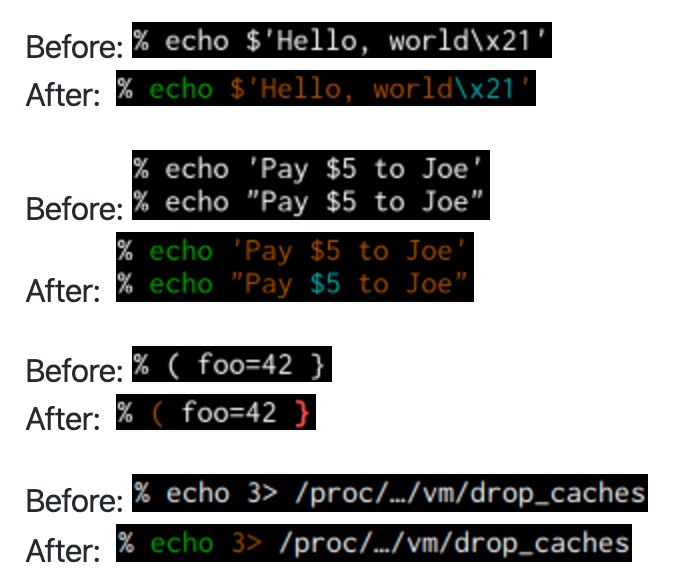zsh-syntax-highlighting examples
To install it, run:
```
brew install zsh-syntax-highlighting
```
And add the following line to your `.zshrc`:\
`source /usr/local/share/zsh-syntax-highlighting/zsh-syntax-highlighting.zsh`
* [zsh-autosuggestions](https://github.com/zsh-users/zsh-autosuggestions): It suggests commands as you type based on your history and completions.
zsh-autosuggestions demo
To install it, run:
```
brew install zsh-autosuggestions
```
And add the following line to your `.zshrc`:\
`source /usr/local/share/zsh-autosuggestions/zsh-autosuggestions.zsh`
* [zsh-history-substring-search](https://github.com/zsh-users/zsh-history-substring-search): Type in any part of any command from your history, and then press chosen keys, such as the `UP` \*\*\*\* and `DOWN` \*\*\*\* arrows, to cycle through matches.
zsh-history-substring-search demo
To install it, run:
```
brew install zsh-history-substring-search
```
And add the following line to your `.zshrc`:\
`source /usr/local/share/zsh-history-substring-search/zsh-history-substring-search.zsh`
If you want to use [zsh-syntax-highlighting](https://github.com/zsh-users/zsh-syntax-highlighting) along with this script, then make sure you load it *before* you load this script.
Also, you need to map your arrow keys. Add the following *after* the source command.
```
bindkey '^[OA' history-substring-search-upbindkey '^[OB' history-substring-search-down
```
**Oh My Zsh plugins**\
The following plugins are made available by Oh My Zsh, like any other plugin found [here](https://github.com/ohmyzsh/ohmyzsh/tree/master/plugins). To install it, just add its name to the `plugins` array in your `.zshrc` file.
For example, to install all the recommended plugins:
```
plugins=(alias-finder brew common-aliases copydir copyfile docker docker-compose dotenv encode64 extract git jira jsontools node npm npx osx urltools vi-mode vscode web-search z)
```
* [alias-finder](https://github.com/ohmyzsh/ohmyzsh/tree/master/plugins/alias-finder): This plugin searches the defined aliases and outputs any that match the command inputted. This makes learning new aliases easier.
* [brew](https://github.com/ohmyzsh/ohmyzsh/tree/master/plugins/brew): The plugin adds several aliases for common [brew](https://brew.sh) commands
* [common-aliases](https://github.com/ohmyzsh/ohmyzsh/tree/master/plugins/common-aliases): This plugin creates helpful shortcut aliases for many commonly used commands
* [copydir](https://github.com/ohmyzsh/ohmyzsh/tree/master/plugins/copydir): Copies the path of your current folder to the system clipboard
* [copyfile](https://github.com/ohmyzsh/ohmyzsh/tree/master/plugins/copyfile): Puts the contents of a file in your system clipboard so you can paste it anywhere
* [docker](https://github.com/ohmyzsh/ohmyzsh/tree/master/plugins/docker): This plugin adds auto-completion for [Docker](https://www.docker.com).
* [docker-compose](https://github.com/ohmyzsh/ohmyzsh/tree/master/plugins/docker-compose): This plugin provides completion for [Docker Compose](https://docs.docker.com/compose/) — as well as some aliases for frequent Docker Compose commands
* [dotenv](https://github.com/ohmyzsh/ohmyzsh/tree/master/plugins/dotenv): Automatically load your project ENV variables from a `.env` file when you `cd` into the project root directory
* [encode64](https://github.com/ohmyzsh/ohmyzsh/tree/master/plugins/encode64): Alias plugin for encoding or decoding using the `base64` command
* [extract](https://github.com/ohmyzsh/ohmyzsh/tree/master/plugins/extract): This plugin defines a function called `extract` that extracts the archive file you pass it, and it supports a wide variety of archive file types
* [git](https://github.com/ohmyzsh/ohmyzsh/tree/master/plugins/git): Provides many [aliases](https://github.com/ohmyzsh/ohmyzsh/tree/master/plugins/git#aliases) and a few useful [functions](https://github.com/ohmyzsh/ohmyzsh/tree/master/plugins/git#functions)
* [jira](https://github.com/ohmyzsh/ohmyzsh/tree/master/plugins/jira): CLI support for Jira interaction
* [jsontools](https://github.com/ohmyzsh/ohmyzsh/tree/master/plugins/jsontools): Handy command-line tools for dealing with JSON data
* [node](https://github.com/ohmyzsh/ohmyzsh/tree/master/plugins/node): This plugin adds the `node-docs` function, which opens the specific section in the [Node.js](https://nodejs.org) documentation
* [npm](https://github.com/ohmyzsh/ohmyzsh/tree/master/plugins/npm): The npm plugin provides completion as well as adding many useful aliases.
* [npx](https://github.com/ohmyzsh/ohmyzsh/tree/master/plugins/npx): This plugin automatically registers the npx command-not-found handler if `npx` exists in your `$PATH`
* [osx](https://github.com/ohmyzsh/ohmyzsh/tree/master/plugins/osx): This plugin provides a few utilities to make it more enjoyable on macOS
* [urltools](https://github.com/ohmyzsh/ohmyzsh/tree/master/plugins/urltools): This plugin provides two aliases to URL encode and URL decode strings
* [vi-mode](https://github.com/ohmyzsh/ohmyzsh/tree/master/plugins/vi-mode): This plugin increase Vi-like Zsh functionality
* [vscode](https://github.com/ohmyzsh/ohmyzsh/tree/master/plugins/vscode): This plugin makes interaction between the command line and the VS Code editor easier
* [web-search](https://github.com/ohmyzsh/ohmyzsh/tree/master/plugins/web-search): This plugin adds aliases for searching with Google, Wikipedia, Bing, YouTube, and other popular services
* [z](https://github.com/ohmyzsh/ohmyzsh/tree/master/plugins/z): This plugin defines the [z command](https://github.com/rupa/z) that tracks your most visited directories and allows you to access them with very few keystrokes
**Aliases**\
Often-used commands can be abbreviated with an alias. `alias tf=”tail -f”` makes it so you can run `tf` instead of typing `tail -f`.
You can add as many aliases as you want to your `.zshrc`.
Plugins like Git and Common Alias add a lot of aliases that’ll make you type less. But it can be hard to learn them all. That’s what the `alias-finder` plugin is for.
If you want to know what aliases exist for, it’s `git commit`:
‘alias-finder’ example
You can also set `ZSH_ALIAS_FINDER_AUTOMATIC=”true”` in your `.zshrc` to have it run automatically before each command.
There are three types of aliases:
* *command* aliases: just like the `tf` example above
* *global* aliases: which are substituted anywhere on a line. For example, the `G` alias added by the common-aliases plugin gets replaced by `| grep`.\
`ls G foobar` => `ls | grep foobar`
* *suffix* aliases: These are special aliases that are triggered when a file name is passed as the command. For example: `alias -s pdf=acroread` invokes acroread when you run `file.pdf`.
Command aliases can also access the original command’s arguments by using the array `$`:
```
loop() { for x in {1..$1}; do $@[2,-1]; done}
```
This alias runs a given command *x* times. For example: `loop 10 echo ‘hello’` will print `hello` 10 times.
### [Node.js](https://nodejs.org)
The JavaScript runtime built on Chrome’s V8 JavaScript engine. It’s the most popular framework for running and building web applications.
To install it, run:
```
brew install node
```
If you need to manage multiple applications that need different versions of Node, I recommend [nodenv](https://github.com/nodenv/nodenv).
### [**Docker**](https://www.docker.com)
Docker allows you to develop and deliver software in packages called containers. Containers are isolated from one another and bundle their own software, libraries and configuration files.
To install it, run:
```
brew install --cask docker
```
You should also check out [lazydocker](https://github.com/jesseduffield/lazydocker), a great CLI tool for docker and docker-compose.
### [tldr](https://github.com/tldr-pages/tldr)
A collection of simplified and community-driven man pages.
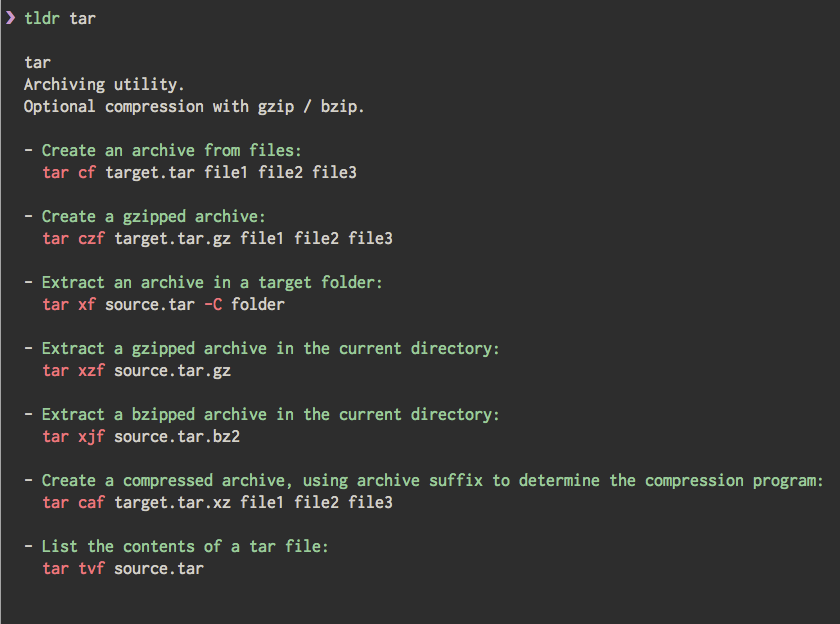tldr example
To install it, run:
```
brew install tldr
```
### [htop](https://linux.die.net/man/1/htop)
It’s similar to top but allows you to scroll vertically and horizontally so you can see all the processes running on the system, along with their full command lines.
To install it, run:
```
brew install htop
```
#### Source
---
# Agent Instructions
This documentation is published with GitBook. GitBook is the documentation platform designed so that both humans and AI agents can read, navigate, and reason over technical content effectively. Learn more at gitbook.com.
## Querying This Documentation
If you need additional information that is not directly available in this page, you can query the documentation dynamically by asking a question.
Perform an HTTP GET request on the current page URL with the `ask` query parameter, and the optional `goal` query parameter:
```
GET https://wiki.reanimated.lt/dev/mac/set-up-for-web-development.md?ask=&goal=
```
`ask` is the immediate question: it should be specific, self-contained, and written in natural language.
`goal` is optional and describes the broader end goal you are ultimately trying to accomplish on behalf of the user. GitBook uses it to tailor the answer towards what is most useful for that goal.
The response will contain a direct answer to the question and relevant excerpts and sources from the documentation.
Use this mechanism when the answer is not explicitly present in the current page, you need clarification or additional context, or you want to retrieve related documentation sections.